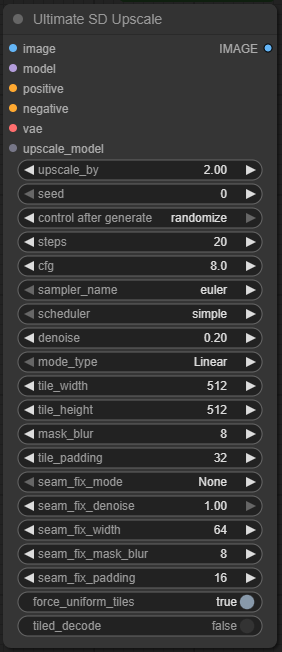
Ultimate SD Upscale
Welcome to the Swiss Army Knife of image upscaling in ComfyUI. The Ultimate SD Upscale node is a tile-based upscaling and enhancement tool that cleverly slices images into manageable chunks, passes each through a Stable Diffusion pipeline, and then stitches them back together—all while doing its best not to leave them looking like a poorly glued jigsaw puzzle.
This node is designed for detailed enhancement of large images using Stable Diffusion's text-to-image (or img2img) capabilities. It works best when you want to upscale an image, add detail or variation, or reprocess large generations that standard pipelines can’t handle due to VRAM constraints.
🧠 What This Node Does
- Slices your image into tiles.
- Optionally applies a mask and blur around tile edges to reduce seams.
- Upscales each tile individually through the SD pipeline using text prompts.
- Reconstructs the image from the tiles, applying optional seam correction.
- Handles large image upscaling while letting you apply prompt-based enhancement at scale.
🧩 Inputs & Outputs
| Port | Type | Description |
|---|---|---|
image | Image | The input image to be upscaled/enhanced. |
model | Model | Loaded Stable Diffusion model to use. |
clip | CLIP | Corresponding CLIP model for prompt embedding. |
vae | VAE | Optional, for decoding outputs. |
positive | Conditioning | Your prompt in encoded form (CLIP Text Encode). |
negative | Conditioning | Your negative prompt (undesired features). |
mask | Image | Optional image mask (for applying masked generation). |
⚙️ Settings (with Extreme Detail)
upscale_by (float, default: 2.0)
How much to enlarge the original image by.
- What it does: Multiplies both width and height by this factor.
- Recommended range: 1.5–4.0
- Tip: Going above 2.5–3.0 will drastically increase VRAM use and tile count. Don’t say I didn’t warn you.
seed (int, default: -1)
Seed for deterministic generation.
-1: Random seed.- Any positive int: Makes results reproducible.
- Useful when testing prompt effects or creating consistent variations.
control_after_generate (enum: fixed, increment, decrement, randomize)
Controls how the seed behaves per tile.
fixed: Same seed for every tile = consistent style.increment: Adds 1 per tile. Slightly changes each tile—great for subtle detail variety.decrement: Subtracts 1 per tile. Same idea, different direction.randomize: Each tile gets a new random seed = chaotic beauty or absolute disaster.
cfg (float, default: 7.0)
Classifier-Free Guidance Scale.
- Controls how much the model "listens" to your prompt.
- Lower: More randomness, possibly artistic.
- Higher: More prompt-locked and rigid.
- Typical range: 5–12. Go beyond 13 and you’re just yelling at the model.
sampler_name (string)
Choose your sampling algorithm.
- Works just like in the KSampler node.
- Use DPM++ 2M or DPM++ SDE for clean details, or Euler a for speed.
- Combine with proper scheduler for best results. (See KSampler documentation for in-depth sampler/scheduler combos.)
scheduler (string)
How noise is scheduled during denoising.
- Normal, Karras, Exponential, and more.
- Karras tends to produce smoother outputs in upscaling contexts.
denoise (float, 0.0–1.0)
Amount of noise to reintroduce.
- 0.0 = no change to input tiles
- 1.0 = generate completely new image based on prompt
- For upscaling: 0.2–0.5 is usually the sweet spot.
- For full re-prompting: crank it up.
model_type (enum: linear, chess, none)
Defines tile stitching behavior.
linear:
- Tiles are processed row-by-row (left to right, top to bottom).
- Pros: Predictable behavior, easier to debug.
- Cons: May have visible seams if prompt isn’t strong or CFG is low.
chess:
- Alternates tile processing like a checkerboard.
- Pros: Seam reduction, since surrounding tiles aren’t processed back-to-back.
- Cons: Slightly longer to process, less predictable randomness.
none:
- Processes all tiles independently.
- Pros: Absolute freedom for chaos.
- Cons: Highest chance of seams and tile dissonance. Best used with strong prompts and denoise.
tile_width & tile_height (int, default: 512)
Size of the tile chunks in pixels.
- Must be divisible by 8.
- Affects VRAM usage and performance.
- Smaller tiles = better seam handling, but slower.
- Larger tiles = fewer seams, faster, but harder on memory.
mask_blur (int, default: 8–16 recommended)
Applies Gaussian blur to the tile mask.
- Prevents hard edges and obvious cuts between tiles.
- Increase if you're seeing tile lines or artifacts.
tile_padding (int, default: 32 or 64)
Extra pixels added around each tile.
- Gives the model “context” beyond the tile’s edge.
- Prevents cutoff features like noses or fingers.
- More padding = better quality, but increases overlap and processing time.
seam_fix_mode (enum: None, HalfTile, ScaleDown)
Post-tile blending method to reduce seams.
None: No seam fix applied. Risky, but fastest.HalfTile: Overlays half-tile seams with adjacent results.ScaleDown: Upscales, then scales down to hide seams with resolution loss.
🛠️ Recommended Use Cases
- High-Quality Upscaling: Take a 512x512 image to 2K+ resolution with sharper details.
- Prompt-Driven Enhancement: Add details like "intricate embroidery" or "realistic lighting" to existing images.
- Inpainting Large Areas: Combine with masks to selectively reprocess parts of an image.
- Refining AI Outputs: Fix blurry or underwhelming images from other nodes or generators.
🧵 Workflow Setup
- Input Image → Feed from a Load Image or image output node.
- Prompt Encoding → Use
CLIP Text Encodefor positive and negative prompts. - Model → Load SD1.5/SDXL checkpoint via
Load Checkpoint. - Optional Mask → Mask out areas you want regenerated (use with
Image Mask). - Run → Ultimate SD Upscale processes each tile and reconstructs.
💡 Prompting Tips
- Stay consistent: “Sharp focus, 8K resolution, detailed texture” helps unify all tiles.
- Avoid scene shifts: Prompt with broad environmental or stylistic features rather than object-heavy directions.
- Add redundancy: “intricate details, finely rendered” helps boost cohesion between tiles.
❌ What-Not-To-Do-Unless-You-Want-a-Fire
Congratulations! You've made it this far, which means you're either:
- Actually reading documentation (rare),
- Already in troubleshooting hell (probable), or
- Planning to break things just to see what happens (respect).
So, here’s your do-not-do-this-or-else checklist:
🔥 Crank denoise to 1.0 without a prompt
Unless you want each tile to hallucinate a different universe—don’t. This will give you a checkerboard of chaos. Always give a prompt when denoising above 0.5.
🔥 Use model_type: none + randomize + no seed control
This is the "I want an abstract mosaic of disconnected dreams" setting. If you do want that? Cool. Otherwise, use linear or chess to preserve coherence.
🔥 Set tile_padding to 0
Ah yes, the hard-cut school of image design. Nothing says “I didn’t read the docs” like tile edges with no context. You will get sliced noses, split pupils, and seam artifacts that scream “prototype.”
🔥 Disable seam fixing and use small tiles
That’s a no-no. Unless you're trying to simulate bad Photoshop cloning, use HalfTile or ScaleDown unless you’re testing something specific.
🔥 Prompt like it’s a text adventure
“a cat sitting on a rug under a golden sun with a pear on the corner and a mirror reflecting a dragon” — each tile will interpret this like a stubborn improv actor. Keep your prompts tight and style-based, not overly specific.
🔥 Forget to match VAE/CLIP/Model
If your VAE doesn’t match the model’s latent space, or you’re just guessing which CLIP to use—expect weirdness. Green artifacts, distorted anatomy, and misplaced textures await.
🔥 Upscale-by 4.0 on a potato
Unless your GPU has more VRAM than your childhood trauma, don’t push upscale_by: 4.0 with large tile sizes. You’ll crash. Hard. Like, Ctrl+Alt+Del hard.
🔥 Forget that every tile is reprocessed
Don’t use this node for preserving fine details exactly. Even at low denoise, changes will happen. If you need pixel-perfect upscaling, use traditional methods or latent upscalers.
🔥 Trust it to "just work" on masked inpainting
If you’re using a mask, make sure the masked region makes logical sense with tile overlap. Otherwise? Expect regenerated hair growing out of walls. You’ve been warned.
🧪 Pro Tips
- Combine with
Image SharpenorPost-Processnodes afterward for polish. - Pair with a LoRA for specific style overlays (e.g., anime, hyperrealism).
- Upscale first with
Latent Upscale, then enhance with this node for two-pass precision.
That’s the Ultimate SD Upscale node in all its chunky, tile-tastic glory. It’s a bit like a surgeon with a sledgehammer—handle it wisely and it'll reward you with beautifully detailed results. Misuse it and… well, you’ll see.