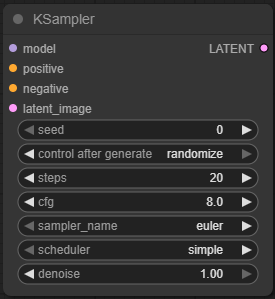
KSampler
The engine of generation in ComfyUI. This node takes your model, your prompt, your settings, and cranks out images by denoising a latent tensor into art. It’s where diffusion happens, and where your GPU earns its keep.
🔌 Inputs
| Input | Type | Description |
|---|---|---|
MODEL | MODEL | The diffusion model you're using — e.g., dreamshaper_8.safetensors, revAnimated_v122.safetensors. Required. |
CLIP | CLIP | Text encoder. Usually comes from the same CheckpointLoaderSimple. It interprets your prompts into guidance. |
Positive Conditioning | CONDITIONING | From your prompt node. Guides the image generation toward the prompt. |
Negative Conditioning | CONDITIONING | Optional but highly recommended. Pushes the image away from undesirable traits (e.g., “blurry, extra limbs”). |
LATENT | LATENT | The initial latent image. This can be random (for text-to-image) or derived from input for img2img, inpainting, etc. |
⚙️ Parameters and Settings (Deep Dive)
🔢 seed (INT)
- Purpose: Sets the starting noise pattern.
- Same settings + same seed = same image. Crucial for reproducibility.
-1= random seed each time.
Use Cases:
- Lock for reproducibility.
- Randomize when exploring.
🎛 control_after_generate (STRING ENUM)
Despite the name, this has nothing to do with ControlNet. This setting tells ComfyUI how to manage the seed value across batches.
Options:
fixed: Same seed for every image.increment: Add +1 to seed for each image.decrement: Subtract -1 per image.randomize: Use a random seed for each.
Why it matters:
fixed= consistent image generation.increment= ideal for controlled variations.randomize= embrace the chaos.
🧮 steps (INT)
- Purpose: Number of denoising iterations (the more steps, the more chances the model has to refine the image).
- Typical Range: 20–50 for best balance.
- Max Range: Up to 150+, but prepare to wait.
Guidance:
- Too few = blurry or underdeveloped results.
- Too many = diminishing returns + GPU tears.
⚖️ cfg (FLOAT)
(Classifier-Free Guidance Scale)
- Purpose: Controls how much the output adheres to the prompt.
- Typical Range: 1–20
- Default Sweet Spot: 6.5–8.5
Low cfg (e.g., 2) = freedom, creativity, also prompt forgetfulness.
High cfg (e.g., 15) = "you said banana samurai, you’re getting banana samurai."
🌀 sampler_name (STRING ENUM)
Determines the sampling algorithm used to perform denoising.
Popular Samplers:
Euler a: Fast, chaotic, great for creativity.DPM++ 2M Karras: Smooth, stable, photorealistic.Heun,LMS,UniPC: All with their own quirks.
Best practice:
Try a few — results can vary dramatically by sampler.
Ready to learn more? Take a look at our deep dive on all the sampler_name options.
📆 scheduler (STRING ENUM)
Defines the noise schedule for denoising steps.
Options:
normal: Uniform distribution.karras: Better for fine details (recommended).exponential: Aggressive at early steps.
Tip: Use karras unless you're specifically told not to.
Ready to learn more? Take a look at our deep dive on all the sampler_name options.
🌫️ denoise (FLOAT)
- Range: 0.0–1.0
- 1.0 = full generation from noise (text-to-image)
- <1.0 = preserve structure (for img2img, inpainting, ControlNet guidance)
Example Use:
1.0→ generate from scratch0.5→ img2img subtle change0.1–0.3→ ControlNet with light touch
🧰 Special Requirements & Notes
- Ensure your MODEL, CLIP, and VAE are compatible.
- Always connect both positive and negative conditioning for best results.
- Don't be afraid to play with CFG and Denoise — they're your finesse tools.
- High
steps+ Highcfg= GPU meltdown risk ⚠️
🔥 What-Not-To-Do-Unless-You-Want-a-Fire
Some mistakes are so common, so predictably catastrophic, that they deserve their own red-flagged list. If you enjoy wasting GPU hours, crashing your ComfyUI session, or summoning unholy Lovecraftian blobs, go ahead and do any of the following:
🚫 Set steps to 150+ with denoise at 1.0
Unless you’re training your patience or testing thermal limits, this is the fastest way to generate pixel soup very slowly.
Instead: Use 25–40 steps for 99% of tasks.
🚫 Use cfg=20 because “higher must be better”
This won’t make your prompt more accurate — it’ll make your image look like a bad Photoshop job run through a paper shredder.
Instead: Stick to the 6.5–8.5 sweet spot. Go higher only if you know what you’re doing.
🚫 Forget to set control_after_generate when doing batch generations
You wanted 8 unique variations. You got 8 clones. Oops.
Instead: Use increment for clean batch diversity.
🚫 Use denoise=0.1 in a text-to-image workflow
You just told the sampler to generate... almost nothing. Enjoy your blank canvas with a faint smudge of regret.
Instead: Use denoise=1.0 for full generations. Lower values are for img2img or ControlNet.
🚫 Combine Euler a sampler with steps=80 thinking it'll be glorious
Nah. Euler a is a fast sampler — not meant for marathon sessions. You're not getting more detail, you're just looping futility.
Instead: Use DPM++ 2M Karras or similar for higher-step use.
🚫 Forget to connect Negative Conditioning
Yes, it's “optional” — just like wearing pants in public is technically optional. But without it, your output will gleefully ignore your expectations and embrace chaos (in all the wrong ways).
🚫 Use incompatible models and CLIP encoders
That “weird green mush with anime eyes and four ears”? Yeah, that’s what happens when you mix a v1.5 checkpoint with a v2 CLIP. Don’t.
🚫 Crank everything to max at once
CFG = 15, steps = 100, resolution = 2048x2048, tiling disabled, sampler = experimental beta nightly — your GPU just left the chat.
🚫 Blame the sampler when your prompt sucks
KSampler is powerful, but it’s not a miracle worker. If your prompt is “woman” and the image is cursed, well… maybe give the poor thing more to work with.
✅ Pro Tip:
When in doubt — lower your steps, simplify your prompt, lower your CFG, and only touch denoise if you know what it does. KSampler rewards precision and punishes overconfidence.
🧪 Example Workflow
[CheckpointLoaderSimple] └─> MODEL ─────────┐ │ [CLIPTextEncode (positive)] ──> KSampler (positive) [CLIPTextEncode (negative)] ──> KSampler (negative) [EmptyLatentImage] ───────────> KSampler (latent) CLIP ─────────────────────────> KSampler (CLIP) KSampler ─────────────────────> [Decode/Save/Display]
⚡ TL;DR Config Cheat Sheet
| Setting | Default / Safe Range | Notes |
|---|---|---|
seed | -1 (random) | Lock for repeatability |
control_after_generate | increment | Varies seed across batch |
steps | 20–30 | 40+ for ultra detail |
cfg | 7.5 | Higher = more prompt fidelity |
sampler_name | DPM++ 2M Karras | Stable and detailed |
scheduler | karras | Best detail control |
denoise | 1.0 | Use <1.0 for image-guided workflows |
📚 Additional Resources
🧠 Final Thoughts
The KSampler is where the real magic happens — the ultimate forge of diffusion sorcery. Every parameter you tweak gives you a different flavor of art, so get in there and experiment. Mastering this node means mastering your output.
Need docs for any of the surrounding nodes (EmptyLatentImage, CLIPTextEncode, etc.)? Just shout — I'll keep the documentation train rolling.